Monday, February 27, 2006

TestDrive: Internet Explorer 7 Beta 2

What's new with IE 7 ? (condensed from site tour)

  1. New Interface : Simple and easy-to-use UI. Includes RSS feeds.
  2. Tabbed Browsing: Microsoft has finally caught up with "tabbing". Clicking on a small tab insert enables you to open a new tab(as opposed to Ctrl+T in Firefox ).
  3. Integrated Search.
  4. RSS Feed : Choose sites where you get most your content and add it to your Feeds list.
  5. Security (?): distinguish potential "phishing" sites with notifier.

Okay, so I may have wasted my time in enumerating the "new" features. Firefox has all the capabilities (except maybe for the "phishing" notification) but with extensions and greasemonkey scripting, any update on IE 7 would still look "old" (my opinion).

Also, IE 7 Beta 2 will only run on Windows XP with SP2

Trying it out:

And so I did try IE 7, but instead of installing it, I followed Jon Galloway's method of creating a stand-alone IE 7 (so that I can have at least a stable IE 6 running side by side with IE 7 beta.)

Problems:

If you have created an existing IE 7 stand-alone from other guides (Extracting the .exe, deleting shlwapi.dll, and creating a text file and renaming it to iexplore.exe.local), then you would have a problem in running IE 6 (erratic behavior like opening url in firefox, and or another window, opening multiple instances of IE, etc.).

In this case, you need to go into the registry and look for: HKEY_CLASSES_ROOT\CLSID\{c90250f3-4d7d-4991-9b69-a5c5bc1c2ae6}. Delete the entire key. (This key is created when IE 7 is first run, even if it is not installed.)

ViewPoints:

  1. IE 7 is not really an "innovative" app, but rather a much needed version upgrade to Internet Explorer. As IE is still the most used browser, it is a fact that not too many people are willing to adopt alternative browsers like Firefox and Opera, and this would greatly benefit that group of users.
  2. On the release notes, it mentions that ActiveX is by default turned off, but it also mentions that Windows Vista will have a new control, which hopefully is not a spin-off of ActiveX.
  3. Finally, looking through the features of IE 7 was like describing Firefox! I guess that's how Microsoft Research works, get the best ideas from the Tech environment, and then package and integrate it to its own Products.

Other Resources:

  1. Download IE 7 beta 2 here.
    Note: If you install IE 7 it will replace IE 6 (of course you can uninstall it and revert back to IE 6). If you'd like to test your site or just have fun reminiscing, you can download stand-alone versions of Internet Explorer from Evolt.
  2. To uninstall IE 7 instructions, and for release notes, refer to the MSDN page.
  3. Follow IE 7 development with the IE blog.

Tuesday, February 21, 2006

Get Ready for Newsvine

Newsvine is about to go public in "a week or two" (according to the Newsvine blog). I'm currently a beta user and am very pleased with what it provides and looking forward to what else they can offer in coming updates.

So what is Newsvine? As described in the site : " A place where anyone can read, write and influence the news." Sounds like Digg? Not really. While Digg (as of the moment) caters to tech news, Newsvine broadens the horizon by having other categories of interest like : Sports, Politics, Tech (of course), Entertainment, Science, Business, Health, and Odd News.

But reading is very different from participating, and Newsvine clearly gives that ability to its users by giving them the chance to move an item "up the vine". You can "seed" (or submit) an article or link that you think is news-worthy. Blogging is also encouraged, as every member is given a "column" page which would appear as : username.newsvine.com .

Tagging functions are helpful in moving around the site and finding the right articles that satisfies your curiousity and interest. There are two sources of articles : one is from news feeds (the Wire) and the other is from those submitted by members (the Vine).

This is actually a great combination as you're actually getting the most from established news sites and from not-so-mainstream sources. The users also participate in "creating" the Top News, and actually contribute in building a balance between news, opinions, editorials, etc.

Thursday, February 09, 2006

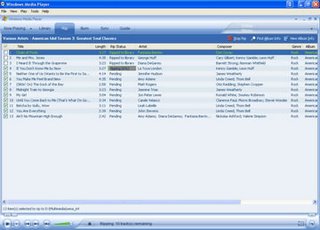
HOW-TOs and Tips : Windows Media Player 10

If you're using Windows XP, and want to upgrade to Windows Media Player 10 click here.

Adding Lyrics to Audio Tracks

Make it easier for you to sing-along with your favorite songs by including the lyrics to the tracks itself. Here's how:

  1. By default, WMP 10 will add to the its Library all the songs played from the local drive. Look inside the "Library" on the main WMP window for the song you want to put lyrics into.
  2. Now, if you have the lyrics already, open the file where you have it (.doc, .txt, .html, etc...) and copy the lyrics. (Highlight lyrics, CTRL+C or right-click "Copy")
  3. Next is to right-click on the song and select " Advanced Tag Editor".
  4. Go to the "Lyrics" tab. Click "Add", select "Language" and paste the lyrics on the "Text" field. Click "Apply" after checking the lyrics.
    Tip: Click on the "Synchronized Lyrics...", you can add the lyrics as the song progresses, so that it appears synchronized when you play it.
  5. On the "Library" play the song and switch to (or click on) "Now Playing". This is where you should see the lyrics on the bottom of the player, you could also set visualizations, etc...
  6. If the lyrics does not appear, press on CTRL+SHIFT+C to enable captions. (Another way is through Play > Captions and Subtitles.)

Ripping CDs to MP3

WMP 10, unlike its predecessors, can directly rip cd tracks into mp3s. WMP 9 and lower requires a plug-in (which you needed to pay for) before being able to write mp3 files. The default wma format is still available and is the default encoder. To enable MP3 encoding, here's a quick walkthrough:

  1. Open "Tools", then "Options".
  2. On the Options window, click on the "Rip Music" tab.
  3. Here you will have the fields for changing the location to where you want to put the ripped files ("Rip music to this location"), format (where you can switch to WMA or MP3) and audio quality.
  4. Just change the field for "Format" to MP3. Edit location and audio quality as needed, also you might want to change "File Name..." to whatever is most appropriate. Click "Apply" to save changes.
  5. Now on the main WMP window, click on "Rip". Insert Audio CD that you want to copy to your local HDD.
  6. Most cds will display track info automatically. If it doesn't, just right-click on the first track and select "Edit". Now input track info and just tab to the next fields.
  7. By default, all the tracks are selected, uncheck those that you don't want to include.
  8. When you're done with checking and enumerating track info, simply click on "Rip Music" (upper right of the screen)

Burning to CDs

It's easier to burn or write to a CD with WMP 10, and there are different ways to do it. Here are some:

Create, Save and Burn a Playlist :

  1. Open your "Library" (as mentioned, WMP10 will automatically place songs you play from your local drive to the "Library").
  2. Drag and drop songs to the "Playing list"
  3. After finishing your list, click on the "Now Playing List" button.
  4. Select "Save Playlist As" to save your playlist (you can name it appropriately so that its easier to find and burn later)
  5. After saving the playlist, Go to the "Burn" Menu Tab.
  6. This window is divided into two, on the left side is a drop-down menu where you can choose playlists, favorites, albums, artists etc. Locate your just created playlist here.

  7. Tip : You can burn straight from a generated "favorites" list. Just choose a favorite like "Favorites - Listen to on Weekdays" (the list is auto-generated by WMP based on listening habits)
  8. Select the playlist. Selected songs should appear, and you have the option to uncheck those that you, at the last minute, would not want to include. On the right panel choose from the drop-down menu whether you would want to create an Audio CD, a DATA CD (mp3,wma format) or Highmat audio.
  9. Click on "Start Burn" for the burning process to begin.

Creating a Burn List :

If you don't want to save a playlist and just want to create a CD directly from the songs that you have on your Library, then :

  1. On the "Library" , highlight all the songs you want to burn. (HOLD on CTRL button and click to select tracks.)
  2. Once you've selected all the songs, right-click on the mouse (while still pointing to any song selected), and click on "Add to" then "Burn list".
  3. Now go to the "Burn" menu and the songs selected should now be on the list. You can uncheck unwanted tracks and also edit the destination CD type. Click "Start Burn" to begin the writing process.

Customizing WMP 10

Changing Skins

You can customize the look and feel of WMP by changing the skin (skin mode) of your player. By default there are a few that you can choose from (pre-installed), but to broaden your list of choices :

  1. Download a skin (.wmz file) from WMplugins (or google it to find other sites)
  2. Once the download completes, open the .wmz file and you should have an option to view it. If you choose "view", it will load the skin automatically.

  3. Tip : Use the keyboard shortcuts to switch from full mode to skin mode. Full Mode by CTRL+1 and Skin mode by CTRL+2.
  4. You can also manually choose skins by going into View > Skin Chooser. Just select the skin of your choice and click on "Apply Skin" afterwards (or ALT+A).
  5. Use CTRL+1(Full mode) and CTRL+2(Skin mode) to switch from the standard view to the skin mode view.

Changing Visualization

When you're playing audio, you can either have a visualization screen running or just a plain black window.

Tip: Disable visualization by going into View > Visualiztion > No Visualization If your audio file has album art, you can also choose that to have a static image displayed.

  1. Change visualization by clicking on View > Visualization and then selecting the one you want to try on.
  2. You can also download visualization from WMPlugins and go through the same process mentioned above.

Synchronize WMP 10 playlists with Removable Devices

Similar to burning a cd, the "Sync" option enables you to use pre-created playlists to synchronize what you're listening to on your desktop and what you're traveling with on a Portable Storage device. In my case, I've tried the synchronization process with a USB Flash drive.

  1. Connect Device and let Windows identify the device.
  2. Open Windows Media Player 10 and select "Sync" from the main menu. A pop-up box will ask if you want to do it automatically or manually.
  3. The connected device should be listed on the right side of the screen. Select a playlist or create a new one from the left pane. (WMP 10 will automatically check everything on the playlist unless there's not enough space)
  4. Click on "Start Sync" to initialize process. This will convert files on the playlist to wma and copy files listed on the playlist to the Portable device.
  5. WMP will put on the removable device an xml file so that the next time the same device is connected, the playlist being synchronized will be updated.

Useful Keyboard Shortcuts (for playback)

  • CTRL+P = (Play or Pause)
  • CTRL+S = (Stop)
  • F8 = (Mute)
  • F10 = (Increase Volume)
  • F9 = (Decrease Volume)
  • CTRL+B = (Play previous)
  • CTRL+F = (Play next)
  • CTRL+1 = (Full mode)
  • CTRL+2 = (Skin mode)

More Keyboard shortcuts

Saturday, February 04, 2006

HOW-TOs and TIPS: XMPlay

Changing Skins for XMPlay:

  1. Choose and download skins from the site. (The skins should be on the same page where the XMPlay download is located.)
  2. Once the download is completed, you should have an .xmpskin file. Cut and paste this file to the same directory where you extracted the XMPlay files.
  3. Open XMPlay, Click "Options and stuff".
  4. Under "Device" should be the entry for "Plugins and skins". Click on this entry.
  5. Change the field for "Current Skin" to the one you've chosen and downloaded.

Enable MP3 encoding

  1. Download LAME and extract lame.exe to the same directory where XMPlay is found.
  2. Open "Options and Stuff" , Locate “Device” > “Encoders”.
  3. On the "Encoder" field, scroll and select "LAME".
  4. Go back to "Device" and look under the "Output" category where you will find the field entry for device. Scroll and change to "Encoder - LAME". You can also play around with the settings for the writing process, as you can change the fields for buffering, channels, sample rate, etc.
  5. Under File writing click on browse and select where you want to write the files to. Click on apply to save changes.
  6. Now you can either encode streaming media or cd tracks. When you click on Play, it will ask you for a file name, after which it starts encoding.

If you want to go back to listening, change back the "Device" field to your soundcard.

Setting XMPlay as your default Audio Player (for supported formats) :

  1. On the "Options and Stuff" window, select "Integration".
  2. Under "Associated file types", select the formats you want XMPlay to open. Select all if you want to play all the supported files through XMPlay.
  3. You can also set other options in here, and even add Desktop and Quick launch icons.
  4. Click apply and changes should take place automatically.

Tip : Once you've set XMPlay as your default player, you might want to change how files open in XMPlay. Open "Options and Stuff" and go to "Miscellaneous". On this page, look for and uncheck "multiple instances" as this forces XMPlay to open a separate instance for each music file opened (excluding those dragged n'dropped).

Creating Playlists

Having playlists enables XMPlay to load a group of songs in one instance of XMPlay, and is also useful if you're using XMPlay with a Portable storage device.

  1. Create one by just selecting/opening the songs you want to include. Click on the floppy disk drive image(default skin) which is the "save list" button. Give it a name and save it on the same directory as XMPlay so its easier to retrieve.
  2. You can retrieve the playlist by just opening the .pls file you've created.

Tip : As mentioned, playlists are helpful most especially if you're using different computers and store songs on each of them. Save your playlists together with the XMPlay files on your portable storage device and probably name your playlists according to location (eg: lab.pls , class19.pls , etc.).

Thursday, February 02, 2006

XMPlay : Portable Audio Player Software

Developer : Ian Luck
License : Free
OS : Windows 95/98/NT/2k/ME/XP
Supported playback formats : OGG, MP1, MP2, MP3, WMA, WAV, CDA, MO3, IT, XM, S3M, MTM, MOD, UMX.
Supported playlist formats : PLS, M3U, ASX, WAX
Download size : 323 KB (Zip file contains the following: XMPLAY.TXT, XMPLAY.EXE, XMP-CD.DLL, XMP-WMA.DLL, XMP-WADSP.DLL, FILE_ID.DIZ )

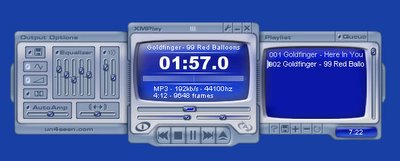
Description : A small packaged audio player that does not need any installation to run, so that you can easily bring with you on a portable drive an audio player that readily supports most-used audio file formats. One can either choose the minimized "capsule" look or the full app window, which shows the playlist on the right and audio output setup on the left (equalizer, balance, interpolation, ramping, etc.). Play around with XMPlay functions inside the "Options and Stuff page" where you can customize the software according to how you would like it to behave. Included in here are the options: Miscellaneous (track looping, fade out, proxy for streams which by default uses the one set in Internet options, etc.) , Playlist (Random Play, Auto Advance, Stop at the end of queue, etc.) , Integration (to set XMPlay as the default player for file formats it supports) , Titles, Shortcuts, MOD, DSP, Device (Output, Plugins and Skins).

Another cool feature is that you can use XMPlay to capture audio streams by using the WAV writer , LAME and OGGENIC encoders. (This is found inside "Options and Stuff" > Device).

+ + + Download Link + + +