Tuesday, June 23, 2026

How to Switch Between Online and Offline Modes in Thunderbird

One of the advantages of using a desktop email client is being able to go offline, over just accessing our email over the web. Being able to disconnect and purposely being offline for focus work, or when it is necessary due to unavailability or poor access to the internet, is one of the benefits of using an application like Thunderbird.

Below is a quick guide on how to toggle between online and offline modes in Thunderbird.

Switching Between Online and Offline Modes in Thunderbird

There are two methods to toggle or switch between online and offline modes.

Interface Method

  1. At the bottom left of Thunderbird, look for the "Signal" icon. Clicking on the icon will toggle Thunderbird between Online and Offline modes.

  2. If this is the first time that you are going offline, then the Signal icon would show an online status ( as shown in the image below ).


  3. Click on the "Signal" icon to go Offline.

  4. There will be a dialog box asking if you would like to download your emails before going offline. If you would like your emails to be available once you go offline, click on the button "Download Now".


  5. You will see the download / sync progress on the bottom right of Thunderbird.

  6. Once downloading is complete, the "Signal" icon will be grayed out and will have a slash in the middle to icon, meaning Thunderbird is now in offline mode.


Menu App Method

  1. First, if you are unable to see the menu bar which should be below the search bar at the top of the application, you can press ALT to temporarily reveal the Application Menu bar.

  2. If you are still unable to see the menu bar, you can enable it by clicking on the "hamburger" icon ( three horizontal lines ) on the top right of the app near the "Minimize" and "Close" buttons. Navigate to View > Toolbars and click to enable "Menu Bar".


  3. From the Main Application Menu, navigate to File > Offline and you can toggle "Work Offline" from there.


Wednesday, June 17, 2026

Show File Name Extensions in Windows 11 File Explorer

By default, and as a consistent design decision going back to previous versions, the Windows 11 File Explorer hides file name extensions. Though it simplifies the interaction between a casual user and provides a cleaner user interface, there are advantages and most would like to have file name extensions to be shown. Being able to verify actual file name extensions gives users better recognition and control over their files, from being able to quickly spot disguised executables ( e.g. invitation.pdf.exe ) and avoid malicious software being run or installed on their machines, to having better control when working with different types of files, like when viewing files that have similar or the same names ( e.g. image.jpg and image.png ). Visual cues like icons are not as reliable as actually knowing the file name extensions of the files that we manage and work with.

Below are 2 ways to enable file name extensions to be shown in Windows 11 File Explorer.

View options in File Explorer ( Quickest Method )

  1. Open File Explorer ( Windows Key + E )
  2. On the toolbar, click on View -> Show -> File Name Extensions. File Name Extensions should have a checkmark after being selected or clicked.
  3. Filename extensions should now be displayed and shown in File Explorer.

Folder Options ( Traditional Method )

  1. Open File Explorer ( Windows Key + E )
  2. Click the three-dot menu and select Options
  3. In the Folder Options dialog, open the View tab
  4. Under Advanced settings, look for and uncheck the setting for Hide extension for known file types.
  5. Click Apply and then OK.

Sunday, July 21, 2024

Backup GMail to Thunderbird ( IMAP )

  1. Download and install Thunderbird.
  2. Run Thunderbird.
  3. Provide email address and password during automatic configuration.
  4. Allow access to GMail when prompted by Google.
  5. Allow Thunderbird to do initial synchronization. Default setting of Thunderbird is to download for all folders.
  6. Go offline and proceed with the prompt to download messages for offline use. Download progress should be displayed at the bottom of the Thunderbird window.
  7. Go to General Settings > Offline Settings. Turn off “Automatically follow detected online state” and under “Manual state when starting up”, select “Offline".


  8. Review messages in offline state to check if all messages have been downloaded.

Optionally, if the backup is for archiving an offline copy that will be stored in an external storage, you can download Portable Thunderbird, and use the same steps above for backing up your email.

Monday, February 15, 2016

Disable Adaptive Brightness on Windows 8, 8.1 and 10

If you have a newer laptop running Windows 8, 8.1 and 10, you probably have noticed your screen automatically adjusting brightness when switching applications that have light to dark backgrounds, or when working in different lighting conditions. This is due to a feature that makes use of the ambient light sensors on your laptop to automatically adjust your screen's brightness level - aptly named Adaptive Brightness. This can be useful for conserving battery life, but can be annoying when you are trying to focus, read or work.

Disable Adaptive Brightness ( I tested this on Windows 8.1, but should work on both 8 and 10 )

  1. Open the Windows Control Panel ( Do Windows key + C on your keyboard to open the Windows Charms, click on Settings and select Control Panel ).
  2. From the Control Panel, navigate to Hardware and Sounds > Power Options.
  3. On your selected Power Plan, click on Change Plan Settings.
  4. Next, find and go to Change advanced power settings.
  5. On Power Options, look for Display and click on the plus sign to expand the available options.
  6. Expand Enable adaptive brightness and turn off for either On battery or plugged in, or turn off for both.
  7. Click on Apply to save changes.


Note: After doing the steps above, you may need to restart your PC for changes to take effect.


Tuesday, December 23, 2014

VLC does not support the audio or video format "G2M4"

While trying to play a GoToMeeting Recording, I encountered the following error message:

VLC does not support the audio or video format "G2M4". Unfortunately there is no way for you to fix this.

To resolve the issue, I downloaded and installed the Windows Media Player codec from GoToMeeting. Follow the link and click on the button "Install GotoMeeting codec".

Saturday, April 12, 2014

Using .ico format in Photoshop

I usually would just use free online converters for generating favicons, but recently I just stumbled upon an old plugin that works from Photoshop 5.0 ( on Windows ) up to latest version. Just remember to download the correct plugin version and read the instructions for proper installation.

Link: ICO (Windows Icon) file format plugin for Photoshop

Thursday, August 30, 2012

Remove Search the web (Babylon) from Firefox

If opening a browser you find out that your default search has been changed to Babylon search, and that your browser now has the Babylon toolbar, then a recent application you just installed has been bundled with an installer for this sneaky toolbar and browser extension for Firefox, Chrome and IE.

You can follow this guide from a Babylon support page on how to remove the unwanted application and extensions that it has installed on Firefox and Chrome and Internet Explorer.

After following the guide, try to install and run Spybot ( a malware removal tool ) to remove registry entries that Babylon has created or changed.

I found that after doing the removal of the applications associated with Babylon, uninstallation of browser extensions and running Spybot, Firefox still had some settings that remained from the Babylon software, which resurfaced after updating Firefox to a newer version. One of things that resurfaced was that my search bar was using Babylon again. To remove these settings, what I did was to reset Firefox to its default settings. You can do this by:

Important note: Resetting Firefox will remove all the things that have been accumulated by Firefox, including history, saved site passwords, etc.

  1. Click on the Firefox menu button and navigate to Help > Restart with Addons Disabled.

  2. On the popup box, select Restart.

  3. Once Firefox starts up again, it will open another dialog box. Select Reset Firefox. Confirm that you really want to reset by clicking on Reset Firefox for the second time.

  4. Once Firefox starts up again, you will be given the first run screen, as if you have just reinstalled Firefox.

Tuesday, August 14, 2012

Changing from Dynamic to a Static Port for an SQL Server Named Instance

  1. Open SQL Server Configuration Manager

  2. Expand SQL Server Network Configuration

  3. Open ( Double-click ) on Protocols for

  4. If not enabled, change TCP/IP status to enabled ( Right-click and select Enable ). If already enabled, open TCP/IP ( Double-click )

  5. On TCP/IP Properties go to the IP Addresses, scroll down to IPAll. Change the value for TCP Dynamic Ports to blank, and the TCP port to the Static Port that is desired ( for example 1433 )

  6. Click Apply to make changes, and OK to close the window.

  7. Restart the SQL Server Services ( on SQL Server Configuration Manager, right click on SQL Server Services and click restart )

Note: Guide above is applicable to MS SQL Server 2008. Steps may vary depending on the version of MS SQL that you have.

Friday, June 15, 2012

Disable Avast! Antivirus Update Notification Sound and Popup


I've been using Avast! on my personal machine for a couple of years now, and even though I like being reminded that my Antivirus has been updated, there are times that I am focused on something and the sudden sound and popup reminder becomes a distraction.

Note: Instructions below are based on Avast! 7.

To disable sounds:
  1. Open Avast! by clicking on the Toolbar tray icon.
  2. Click on Settings near the top-right of the Avast! screen.


  3. On the left menu of the Basic Settings page, select Sounds and Uncheck Enable avast! sounds.


To disable update notifications:

  1. On the left menu of the Settings page, select Updates, Click on Details to show extra options, and uncheck Show notification box after automatic update.


To disable both sound and popup notifications ( Silent / Gaming Mode ):

  1. On the left menu, select Silent / Gaming Mode, Tick the checkbox for Silent / Gaming Mode.


Tuesday, May 15, 2012

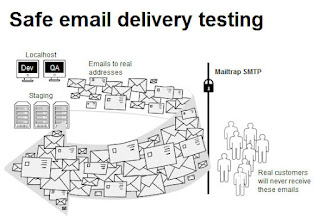
Using a Test SMTP Server For Local Drupal 7 Email Testing

I don't usually require testing email notifications and other email related functions during local site development using Drupal, but there are times when you really need to test how, when and to whom emails are being sent to.

I use Uniform Server for local development, but this should apply to any WAMP install, as it uses just 2 things:
  1. First, the SMTP module
  2. Second, an account in mailtrap.io
For those who are wondering why one should use mailtrap instead of just connecting to hotmail, yahoo or gmail accounts, reasons are:
  • Most email providers will require you to connect via SSL / TLS
  • and will also try to block you believing you are trying to send out spam
Steps
  1. To get SMTP functionality, install the SMTP module
  2. Once you have installed the module, it will require you to input SMTP details. This is where mailtrap.io comes in.
  3. Create an account in mailtrap.io. Once you sign up, you'll receive a confirmation email in your inbox.
    Confirm your email
  4. Go back to mailtrap.io and create an Inbox
  5. Once an Inbox is created, you'll be given SMTP details that you can use
  6. Copy over to the SMTP module configuration page the SMTP details like SMTP Server, Username, Passwords, etc.
  7. Save, and test.

Monday, May 07, 2012

Apache crashes when running Drupal on Uniserver 7.1.5 ( Orion )

While installing additional modules to Drupal 6 and 7 on UniServer 7.1.5 ( a portable server on Windows ), I have encountered multiple times Apache having problems starting. Looking at the Apache logs, there are entries for PHP Fatal error: Allowed memory size of 33554432 bytes exhausted.

This can quickly be resolved by increasing PHP Memory Limit to something higher than 32MB.

  1. From root of UniServer, go to usr > local > php and open in a text editor the php.ini file.
  2. Look for memory_limit and increase from 32M to 64M or 128M.

  3. Restart Apache service.

Thursday, March 15, 2012

Create a Bootable DOS Flash Disk

The process is simple, and the end result is a very basic bootable flash disk.


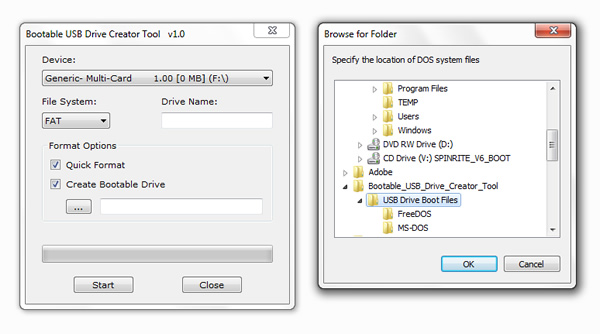
  1. Download Bootable USB Drive Creator Tool from Softpedia, this contains both the formatter and DOS files ( MS-Dos and FreeDos ).
  2. The file download will be in RAR, so extract using an archive utility software like 7-zip.
  3. Once extracted, run the exe file as an administrator ( Right-click > Run as administrator )
  4. On the application, select your usb drive under Device
  5. Check Create Bootable Drive
  6. Browse for the included MS-DOS and FreeDOS folder
  7. Before clicking on Start, make sure that you do not have important files that you want to save on your USB drive, as the process of formatting will delete all the contents of the drive. Click Start to proceed.

After the process, you should have a bootable USB drive with either MS-DOS or FreeDOS.

Alternately, you use another disk formatter and Win98 files, and the process should be the same as above.

Friday, February 24, 2012

What is that  on top of my web page?

 is the BOM or Byte Order Mark of the Unicode standard. To solve issues where the BOM appears on top of your web page, simply open it in a note editor like notepad++ and change formatting to Unicode in UTF-8 without BOM and then save the file.

The BOM should not appear anymore when you view the page on a browser after doing this formatting change.

Resources:

  1. Byte order mark ( Wikipedia )
  2. Notepad++ is an open source text editor. You can download notepad++ here.

Internal Server Error After Migrating a Drupal Site to Go Daddy

Scenario


You have your main domain in Go Daddy with a hosting account linked to it. You either have another domain or subdomain that you want to host on the same hosting account, so you go ahead and create a new subdirectory, and migrate your Drupal files into the newly created directory folder. Once the database has been imported and settings.php updated with the database details, you go to your site, is able to access the home page, but no other page is accessible - you get an Internal Server Error on any page that you try to open, even logging in ( from the home or front page ) gives you the same error.


Solutions to try


If Subdomain

On the root of your Drupal folder, look for the .htaccess file. Download to your local drive and open in a text editor, and uncomment the line:

RewriteBase /

See image below.


If on a Subdirectory

If you are not using a subdomain, but just a subdirectory, try uncommenting the line:

RewriteBase /drupal

Replace /drupal with the name of your drupal directory. See image below.


After saving the file, upload back to your server. Test and see if the change in .htaccess resolved the issue.

Thursday, February 16, 2012

Focus and Track Time with Tomato Doer

Most of us spend our days trying to manage the time that we spend on different tasks, whether its work related or personal chores. Managing time and getting us to focus on whatever we are doing is one of the goals of the Pomodoro Technique, something that you should try if you want to improve your own time management and focus.


There are various tools that you can use to follow the Pomodoro technique, the most simplest being pen and paper. One application that I have found and am currently using is Tomato Doer. It’s portable, keeps a log of your completed sessions and mostly stays out of the way – which is good so that it does not in itself affect your productivity.

You can read more about the Pomodoro technique here first, then try out the tool by downloading it from Sourceforge. Tomato Doer requires Microsoft .NET 4.0 Framework.

Saturday, October 01, 2011

Problem opening Maxthon Portable

Maxthon is a browser that uses both the Trident ( IE ) and Gecko ( Firefox ) browser engines. This browser is available in a portable version, and this quick tip is about how to resolve an issue when opening Maxthon Portable, and it gives you an error saying "Another instance of Portable Maxthon is starting. Please wait for it to start before launching again" ( it should also apply to most cases when you receive an error upon starting the program ).

To resolve the issue, go to the Portable Maxthon folder > Data and look for a file named PortableApps.comLauncherRuntimeData-MaxthonPortable.ini. Delete this file ( don't worry, it will be recreated once Maxthon has successfully opened ) and then try to start Portable Maxthon.

Resources:

  1. Maxthon Site
  2. Maxthon Portable from PortableApps

Tuesday, July 12, 2011

Disable Speed Dial in Opera

Opera's Speed Dial feature offers a quick way to access sites that you regularly visit, but in some cases, like in mine, you may just prefer a blank page and the address bar when you open a new tab. To disable Speed Dial in Opera:

  1. In the Opera address bar, type in about:config or opera:config. This enables you to access Opera's Preferences Editor.

  2. On the Preferences Editor, under User Prefs, look for Speed Dial State. Set the value to 0 ( values: 0 - folded, 1 - normal view, 2 - Read Only and 3 - disabled ).

  3. Click Save under the User Prefs section for the setting change to take effect.

Tuesday, July 05, 2011

Video player for .dav files

Trying to view recorded CCTV footage, I had to find a player for playing the .dav format that the CCTV DVR system was recording to. I found 2, the first one was able to open the file but did not properly display the video while the second one actually was able to play it. If you are trying to open a .dvr file, you can also try using any of these 2 and see if it works for you.

  1. DVR365 Player
  2. Mace SQ and HQ File Player

Wednesday, June 29, 2011

Stop Simplenews from sending out a newsletter ( Drupal )

This tip is for people using Drupal and a module called Simplenews for maintaining and sending out newsletters to an email list.

There might come a time when you need to stop simplenews from sending newsletters - maybe because of issues with the module or the Drupal site, or you accidentally sent the wrong newsletter to a certain list of users. Whatever the reason, below is a quick way of stopping Simplenews.

  1. Backup your database first. You can use a module called Backup and Migrate to do so.

  2. Open phpMyAdmin, and look for under your Drupal site's database the simplenews_newsletter table.

  3. Determine the node id of the newsletter you are sending ( going into the edit page would show you the node id on the url ). Look for that node id on the simplenews_newsletter table, and click on the edit button on the left of the row ( pencil icon ).

  4. Change the s_status from 1 ( which means sending ) to either 0 ( unsent ) or 2 ( sent ).

  5. Empty the simplenews_mail_spool table ( this is where all the email addresses and status per message is stored ).

    You can use TRUNCATE to do this, as in the code below:

    TRUNCATE TABLE simplenews_mail_spool

Friday, June 24, 2011

WinFF - Open Source Video Conversion Tool

WinFF is an open source GUI for the swiss army knife of video conversion - ffmpeg. Supports most of the codecs supported by ffmpeg including flv, avi, asf and wmv. Features a simple and easy to use interface, and can do multiple conversions at the same time.

Platforms

WinFF runs on Windows ( Windows 95, 98, NT, 2000, XP, Vista and 7 ) and Linux ( Ubuntu, Debian, Redhat and Suse ). There is also a portable version for Windows.

Resources

  1. WinFF Home
  2. WinFF Downloads
  3. FFmpeg Home
  4. FFmpeg General Documentation