Tuesday, August 14, 2012

Changing from Dynamic to a Static Port for an SQL Server Named Instance

  1. Open SQL Server Configuration Manager

  2. Expand SQL Server Network Configuration

  3. Open ( Double-click ) on Protocols for

  4. If not enabled, change TCP/IP status to enabled ( Right-click and select Enable ). If already enabled, open TCP/IP ( Double-click )

  5. On TCP/IP Properties go to the IP Addresses, scroll down to IPAll. Change the value for TCP Dynamic Ports to blank, and the TCP port to the Static Port that is desired ( for example 1433 )

  6. Click Apply to make changes, and OK to close the window.

  7. Restart the SQL Server Services ( on SQL Server Configuration Manager, right click on SQL Server Services and click restart )

Note: Guide above is applicable to MS SQL Server 2008. Steps may vary depending on the version of MS SQL that you have.

Friday, June 15, 2012

Disable Avast! Antivirus Update Notification Sound and Popup


I've been using Avast! on my personal machine for a couple of years now, and even though I like being reminded that my Antivirus has been updated, there are times that I am focused on something and the sudden sound and popup reminder becomes a distraction.

Note: Instructions below are based on Avast! 7.

To disable sounds:
  1. Open Avast! by clicking on the Toolbar tray icon.
  2. Click on Settings near the top-right of the Avast! screen.


  3. On the left menu of the Basic Settings page, select Sounds and Uncheck Enable avast! sounds.


To disable update notifications:

  1. On the left menu of the Settings page, select Updates, Click on Details to show extra options, and uncheck Show notification box after automatic update.


To disable both sound and popup notifications ( Silent / Gaming Mode ):

  1. On the left menu, select Silent / Gaming Mode, Tick the checkbox for Silent / Gaming Mode.


Tuesday, May 15, 2012

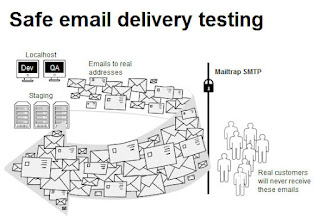
Using a Test SMTP Server For Local Drupal 7 Email Testing

I don't usually require testing email notifications and other email related functions during local site development using Drupal, but there are times when you really need to test how, when and to whom emails are being sent to.

I use Uniform Server for local development, but this should apply to any WAMP install, as it uses just 2 things:
  1. First, the SMTP module
  2. Second, an account in mailtrap.io
For those who are wondering why one should use mailtrap instead of just connecting to hotmail, yahoo or gmail accounts, reasons are:
  • Most email providers will require you to connect via SSL / TLS
  • and will also try to block you believing you are trying to send out spam
Steps
  1. To get SMTP functionality, install the SMTP module
  2. Once you have installed the module, it will require you to input SMTP details. This is where mailtrap.io comes in.
  3. Create an account in mailtrap.io. Once you sign up, you'll receive a confirmation email in your inbox.
    Confirm your email
  4. Go back to mailtrap.io and create an Inbox
  5. Once an Inbox is created, you'll be given SMTP details that you can use
  6. Copy over to the SMTP module configuration page the SMTP details like SMTP Server, Username, Passwords, etc.
  7. Save, and test.

Monday, May 07, 2012

Apache crashes when running Drupal on Uniserver 7.1.5 ( Orion )

While installing additional modules to Drupal 6 and 7 on UniServer 7.1.5 ( a portable server on Windows ), I have encountered multiple times Apache having problems starting. Looking at the Apache logs, there are entries for PHP Fatal error: Allowed memory size of 33554432 bytes exhausted.

This can quickly be resolved by increasing PHP Memory Limit to something higher than 32MB.

  1. From root of UniServer, go to usr > local > php and open in a text editor the php.ini file.
  2. Look for memory_limit and increase from 32M to 64M or 128M.

  3. Restart Apache service.

Thursday, March 15, 2012

Create a Bootable DOS Flash Disk

The process is simple, and the end result is a very basic bootable flash disk.


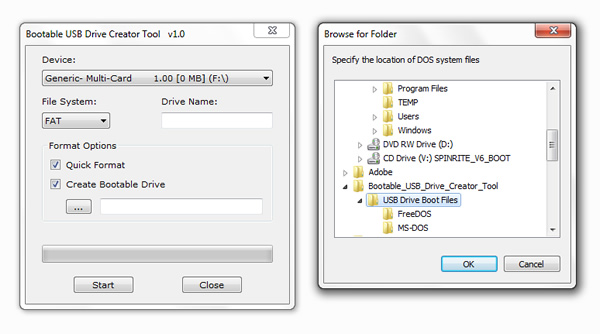
  1. Download Bootable USB Drive Creator Tool from Softpedia, this contains both the formatter and DOS files ( MS-Dos and FreeDos ).
  2. The file download will be in RAR, so extract using an archive utility software like 7-zip.
  3. Once extracted, run the exe file as an administrator ( Right-click > Run as administrator )
  4. On the application, select your usb drive under Device
  5. Check Create Bootable Drive
  6. Browse for the included MS-DOS and FreeDOS folder
  7. Before clicking on Start, make sure that you do not have important files that you want to save on your USB drive, as the process of formatting will delete all the contents of the drive. Click Start to proceed.

After the process, you should have a bootable USB drive with either MS-DOS or FreeDOS.

Alternately, you use another disk formatter and Win98 files, and the process should be the same as above.

Friday, February 24, 2012

What is that  on top of my web page?

 is the BOM or Byte Order Mark of the Unicode standard. To solve issues where the BOM appears on top of your web page, simply open it in a note editor like notepad++ and change formatting to Unicode in UTF-8 without BOM and then save the file.

The BOM should not appear anymore when you view the page on a browser after doing this formatting change.

Resources:

  1. Byte order mark ( Wikipedia )
  2. Notepad++ is an open source text editor. You can download notepad++ here.

Internal Server Error After Migrating a Drupal Site to Go Daddy

Scenario


You have your main domain in Go Daddy with a hosting account linked to it. You either have another domain or subdomain that you want to host on the same hosting account, so you go ahead and create a new subdirectory, and migrate your Drupal files into the newly created directory folder. Once the database has been imported and settings.php updated with the database details, you go to your site, is able to access the home page, but no other page is accessible - you get an Internal Server Error on any page that you try to open, even logging in ( from the home or front page ) gives you the same error.


Solutions to try


If Subdomain

On the root of your Drupal folder, look for the .htaccess file. Download to your local drive and open in a text editor, and uncomment the line:

RewriteBase /

See image below.


If on a Subdirectory

If you are not using a subdomain, but just a subdirectory, try uncommenting the line:

RewriteBase /drupal

Replace /drupal with the name of your drupal directory. See image below.


After saving the file, upload back to your server. Test and see if the change in .htaccess resolved the issue.